natural systems

The Lifecycle of a Salmon

Welcome to Change is Simple’s Online Learning Platform!

Overview: Today, we are going to finish our series of lessons related to the importance of fish to our natural environment! This lesson will focus on one of the most important keystone species on the entire planet, the Pacific Salmon! We are going to explore the transformations these amazing animals undergo throughout their complex life-cycle, learn about their incredible migrations and even get crafty!

Grade Level: K-6

Theme: Natural Systems

Supervision needed? No

Essential Questions: 

  • What are the different life-cycle stages of a salmon?

  • Where do salmon travel and at what stages of their lives?

Materials Needed:

  • colored writing utensils

  • blank piece of paper

Standards:

PLEASE WATCH THIS VIDEO SO WE CAN GET STARTED!

Now it’s Time for YOU to design your own displays of a Salmons Lifecycle!

Lets get crafty and create a visualization of the incredible changes these fish undergo throughout thier lives

To really see how these fish change, we are going to use pictures to represent each stage of the salmon’s life! If you have a printer, feel free to print and cut out the pictures I created for your chart. If you don’t, even better! you get to create your own! You can use my pictures as a guide. Feel free to add as much or as little detail as you like, just make sure the size and color are accurate!

STEP 1-Add your first Location!

Salmon begin their lifecycles high up in the mountains in fresh water streams and creeks. This habitat provides the safest place for salmon to lay their eggs!

IMG_9302.jpg

Step 2: Add the first stage of life, Eggs!

IMG_9301.jpg

Salmon lay anywhere from 2,000 to 6,000 eggs! However, only about 15% of the eggs survive. Eggs are laid amongst the gravel in the stream beds, protecting them from predators, freezing and srong currents. Fertilized eggs develop in the gravel for 3 months!

Step 3: Add the second stage of life, Alevins!

IMG_9294.jpg

Alevin emerge from their eggs four to six weeks after hatching. They remain in the gravel where the yolk sack under their neck provides them with all the nutrients they need to grow!

Step 4: Add the Second Stage of Life, Fry!

IMG_9295.jpg

After their egg sacs have been absorbed, young salmon become Fry. Fry swim in search of food. They remain near their place of birth and forage for insects, larvae and other fish eggs to sustain them.

Step 4: Add the next stage of life, Parr!

IMG_9296.jpg

Parr are juvenile salmon ready to begin their journey from their place of birth. They head downstream guided by gravity and stream flow, destined for estuaries near the ocean!

Step 5: Add your next location, The Estuary

IMG_9303.jpg

The young salmon’s next home is the estuary! This is where salt water and freshwater mix, usually at the mouths of rivers where they meet the sea. This habitat provides the salmon a safe haven, sheltered from the open sea where they begin their transformation into a salt water fish!

Step 6: Add the next stage of life, Smolt!

IMG_9297.jpg

Once in the estuary, the salmon becomes a smolt. It undergoes a process known as “smoltification”, where it’s body begins to adapt to salt water. It undergoes changes in body shape, color and physiology (inside it’s body!). In the estuary it feasts on zooplankton, insects, sand-fleas and shrimp! It usually stays in the estuaries 1-3 months.

Step 7: Add the Next Location, the open ocean!

IMG_9304.jpg

Once the salmon leaves the estuaries, it ventures into the vastness of the open sea! Adult salmon venture deep into the ocean, often traveling up to 2,500 miles from where it hatched!

Step 8: Add the Next Stage of life, Adult

IMG_9299.jpg

Once the salmon enters the ocean, it is considered an adult. An adult salmon is perfectly adapted to life in the open ocean. They feast on zooplankton, larval crustaceans an small fish! Depending on the species, adult salmon spend anywhere between 4 months to 5 years at sea!

Step 9: Add the Last stage of life, Spawning Adult Salmon

IMG_9300.jpg

When they are ready to breed, spawning adult salmon head back to the same riverbed where they were born. They stop eating and use all of their strength to get back to their spawning grounds. During this phase, they undergo radical changes yet again, changing body shape and turning a bright red and green color! Once the salmon returns to its stream to spawn, its lifecycle will end.

Step 10: The completed Salmon Lifecycle!

IMG_9307.jpg

Time to Reflect!

Lets think about this

  • Why do salmon spawn in freshwater then venture out into the open ocean?

  • How many different phases does the salmon go through during it’s lifecycle?

  • Why is the salmon a keystone species both for the ocean AND the forest?

  • How far can a salmon travel from where it was hatched?

  • What are some ways that humans impact salmon? and how can we help?

Did you enjoy today’s activity? Stay tuned for more, and in the meantime…

Send us a photo of yourself doing today's activity and if you would like, please share your name(s) and where you are from with cisonline@changeissimple.org!

Let’s See those fish pictures!!


Biomimicry

Welcome to Change is Simple’s Online Learning Platform!

Overview: Today we are going to take a look at a topic that you may not have ever learned about in school, yet it is something that impacts your life every single day. Today we are going to examine the exciting field of biomimicry! Biomimicry is the design and production of items or services that reflect processes that occur in nature. When we create and build things, like airplanes for example, we can mimic the biology of birds that depend on their wings to take flight.

Grade Level: 3-5

**For older students, dive deeper into this activity with our additional activity found down below in this blog post!

Theme: Earth Systems

Supervision needed? Yes

Essential Questions: 

  • What is biomimicry?

  • How do humans use biomimicry to our advantage?

Materials Needed:

  • Activity One:

    • Multiple different surfaces

      • A plastic cutting board, piece of paper, sheet, get creative!

      • Multiple liquid materials

        • water, soap, honey, coconut oil, olive oil, etc.

      • Small object (M&M, penny, eraser)

  • Activity Two:

    • A flower or plant from outside (or from Fridays lesson) Try to choose a wildflower or a plant that is in abundance in your backyard!

    • Toothpicks, tweezers

    • Paper and pencil

    • Optional: Magnifying glass

Standards:

Tune in to the video below to learn more about this incredible topic!

Vocabulary terms

  • Biomimicry: the design and production of materials, structures, and systems that are modeled on biological entities and processes.

  • Engineer (noun): a person who designs, builds, or maintains engines, machines, or public works.

  • Evolution:  the process of growth and development or the theory that organisms have grown and developed from past organisms.

Explore engineering!

There are many different ways engineers can apply the principles of biomimicry to designing something and problem solving. Check out these three activities to explore the ways biomimicry can be used! Choose which activity sounds the most exciting to YOU, and go for it!

Activity 1: Exploring the Features of Slippery Surfaces

This activity is best suited for 5+, unless parental supervision and support is present.

Sometimes, simple biomimicry principles allow us to create an easy solution to an everyday problem. One example of this is how engineers haven taken a cue from a plant, called the pitcher plant. The pitcher plant is a carnivorous plant, meaning it eats insects. When insects land on the pitcher plant, they slip down a tube and get stuck inside the plant. This plant is extremely slippery due to a coating of liquid on the surface of the plant!

For this activity, you will need:

  • Multiple different surfaces

    • A plastic cutting board, piece of paper, sheet, get creative!

    • Multiple liquid materials

      • water, soap, honey, coconut oil, olive oil, etc.

    • Small object (M&M, penny, eraser)

Experiment: Explore which combination of materials and liquids create the most slippery surface possible! Record your findings and observe what elements of your design made the most slippery surface, and why!

Activity 2 Part 1: Deconstruction of a Flower

This activity can be done with all ages.

This activity is going to require a form of reverse engineering. We already learned that engineering is the process of creating a product or solution, and reverse engineering is similar. However, when you reverse engineer, you will be deconstructing something, observing it and recording information about your observations, and then use those observations to create something new!

For this activity, you will need:

  • A flower or plant from outside (or from Fridays lesson) Try to choose a wildflower or a plant that is in abundance in your backyard!

  • Toothpicks, tweezers

  • Paper and pencil

  • Optional: Magnifying glass

Step 1: Separate the parts of the plant/flower (look back to Fridays lesson for a review on the part of the flower!)

Step 2: Observe the colors and textures of the plant/flower. Why do you think there are certain colors on different parts of the flower? Why do you think there are different textures on different parts?

Step 3: Observe the shape of the plant/flower. Why do you think the flower is structured the way it is? Hint: Think about which way the plant/flower grows, which parts of the plant/flower on on the top vs. the bottom and why?

Step 4: Pour water over your plant. Observe what happens. Does the water roll off the plant quickly? Does it get captured/stuck in parts of the plant? Does the water get absorbed into any part of the plant?

Step 5: Answer these questions in your observation: Is the stem of your plant strong/weak/flexible? Can your plant capture lots of sunlight? How? Does your plant have any features to repel predators?

Alternative Activity: If you loved the first part of this activity and are eager to explore more features of nature, before you move on to part 2, get outside! Observe other plants and animals features, such as the way tree branches grow and sway with the breeze, the structure of a spider web, or anything that was mentioned in the video above!

Activity 2 Part 2: Observation/Imitation

Use your observations from part 1 and/or the additional activity to envision a new product that mimics some of the properties of nature that you just observed. Check out these examples to get yourself started!

Observation: The sunflower has very large leaves and petals. This feature may exist to allow the plant to capture lots of sunlight to help the plant grow.

Imitation: I could design a solar panel to mimic the shape and structure of sunflower leaves to capture sunlight for energy production.

Observation: The stem of the sunflower is extremely fuzzy. The fuzz helps keep the plant from losing heat and moisture.

Imitation: I can design a sweater to be fuzzy like the stem of a sunflower to help keep me warm.

Observation: Water rolls off the petals of the flower really quickly.

Imitation: How can I create a material that resembles the structure of a flower petal so that is is water proof/water repellent?

Activity 2 Part 3: Product Creation!

It’s time to get creative! Choose one of the imitations you came up with based off of your observations. Find stuff around your home to make a model of your new biomimicry creation! Send us your photos to cisonline@changeissimple.org

Pollination

Welcome to Change is Simple’s Online Learning Platform!

Overview: Today’s topic is pollination! We will be learning about the structure of flowers and how important flowers are for bees! We will be going outside to find flowers in our own area so we can draw them at home. Then we will be labeling the flower parts learned in the video.

Grade Level:  K-6 **For grade 4+ do the bonus activity in Activity Two!

Theme: Earth Systems, Sustainable Food Systems

Supervision needed? Yes

Essential Questions: 

  • What does pollination mean?

  • How do flowers play a role in bees’ lives?

Materials Needed:

  • Sheet of Paper

  • Colored Pencils

  • Camera

Standards:


step 1: Introduction video


step 2: find & draw

Now it is time to get outside and take a picture of a flower around where you live! If you do not have any flowers where you live, choose an image online of your favorite flower.

1. Take a picture of it and then head back inside to draw out the flower! Flowers are an incredibly important part of our pollination process. 

*** Make sure to document like a scientist: Location of the flower, date, and time the photo was taken!

April 16th - 3:10PM - Down the street in a garden.

April 16th - 3:10PM - Down the street in a garden.

2. Now grab your colored pencils and a piece of paper and draw out the flower you found! Get creative! 

IMG_0296.jpg

3. Now it is time to label the parts of our flower! 

Parts to label: stigma, anther, petals, stem, and leaves 

IMG_0297.jpg

Bonus! (Grade 4+)

Want more of a challenge?

  • Now write an explanation of why each part of the flower is important. 

  • What is nectar?

  • Where would pollen be found?

***Once you have finished answering the questions above, click below to see an example!


step 3: reflection

Question 1: Why are bees so important? 


Question 2: What gets transferred from flower to flower? What does that transfer help do?


Question 3: What did you like most about today’s activity?

Question 4: Now take a picture of your flower drawing and your reflection questions. Then email them to us at Change is Simple! (amy@changeissimple.org)


step 4: additional resources

Want to learn more? Check out our extra information to fuel your learning!

Did you enjoy today’s activity? Stay tuned for more, and in the meantime…

Send us a photo of yourself doing today's activity and if you would like, please share your name(s) and where you are from with cisonline@changeissimple.org

Exploring Food Chain

Welcome to Change is Simple’s Online Learning Platform!

Overview: Today we are going to explore the ways in which plants and animals are connected through learning about food chains and food webs! Your student will have the opportunity to create a food web and learn about the impact different keystone species have on an entire ecosystem.

Grade Level:  3-5. For older grades, check out Activity 2.

Theme: Earth Systems

Supervision needed? No

Essential Questions: 

Materials Needed:

  • Paper

  • Colored pencils, markers, or crayons

  • Tape

  • Cardboard

  • String

Standards:

  • Ecological Health 13.2 Describe how business, industry, and individuals can work cooperatively to solve ecological health problems, such as conserving natural resources and decreasing pollution

  • Ecological Health 13.4 Identify individual and community responsibility in ecological health.

  • Ecological Health 14.2 Identify ways the physical environment is related to individual and community health


Check out the video below to get started!

Vocabulary

  • Photosynthesis: The process by which green plants and some other organisms use sunlight to synthesize foods from carbon dioxide and water.

  • Primary Producer: an autotroph organism producing complex organic matter, using photosynthesis.

  • Primary Consumer: an organism that feeds on primary producers.

  • Secondary Consumer: an organism that feeds on primary consumers.

  • Tertiary Consumer: an organism that feeds on primary and secondary consumers.

  • Apex Predator: a predator that exists at the very top of the food chain.

  • Keystone Species: a species on which other species in an ecosystem largely depend, such that if it were removed the ecosystem would change drastically.

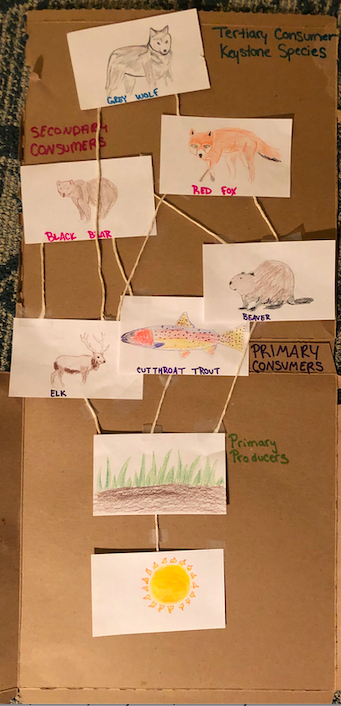
Activity 1: Create your food chain.

Now that you have an understanding of the producers and consumers that make up a food chain, let’s try our hand at making an entire food web!

Screen Shot 2020-04-09 at 5.03.09 PM.png

Materials

  • Paper

  • Colored pencils, markers, or crayons

  • Tape

  • Cardboard

  • String

Step 1: Choose your favorite ecosystem.

An ecosystem is a community of living organisms (ex: plants and animals) and nonliving components (ex: water, and soil) In my video, I showed you a rainforest food chain. However, there are many others: Desert, ocean, tundra, grasslands are just a few! For this activity, I’m going to focus on Yellowstone National Park, which is a boreal forest!

Screen Shot 2020-04-09 at 4.55.19 PM.png

Step 2: Draw the primary source of energy in your ecosystem. (Hint, it’s the same one that was in my video!)

Screen Shot 2020-04-09 at 4.55.22 PM.png

Step 3: Draw 1-3 plants you may find in your ecosystem.

Can you recall from the video what we call plants in a food web?

Screen Shot 2020-04-09 at 4.55.28 PM.png

Step 4: Draw 3 animals that eat the plants you have chosen.

Can you remember what we call organisms that eat our plants/primary producers?

Screen Shot 2020-04-09 at 4.55.33 PM.png

Step 5: Draw 2 animals that eat the animals you just drew!

Can you remember what we call animals that eat our primary consumers?

Step 6: Draw the animal(s) that eat the animals you just drew!

Can you remember what we call the animals that eat our secondary consumers?

Screen Shot 2020-04-09 at 4.53.27 PM.png

Step 7: Cut out all of your plants and animals. place the cut outs On your board.

Step 8: Create your food web! use markers or string to draw connections between the animals. Most animals eat more than one other species, so be sure to represent that!

Be sure to label your plants and animals by the primary producer, primary consumer, secondary consumer, tertiary consumer, and apex predator.

Additional Activity

For older students or for those interested in learning about the impacts of reintroducing a keystone species into the wild, check out this video on the grey wolf in Yellowstone National Park!

Read and Respond Activity

Read the following summary of an article written about the impact reintroducing grey wolves in yellowstone had on the ecosystem.

The Reintroduction of the Grey Wolf

“Wolves are causing a trophic cascade of ecological change, including helping to increase beaver populations and bring back aspen, and vegetation.” (Farquhar 2019).

In the 1930’s the grey wolf was poached to extinction in Yellowstone National Park. The absence of the wolf meant elk had fewer predators, and as a result elk population skyrocketed. This caused a chain reaction. The elk pushed the ecosystem to its carrying capacity by staying sedentary and heavily consuming willows, cottonwood, and aspen. Willow, being a crucial food source for the beaver along the rivers, declined in population. The decline in willow population led to a decline in beaver population. As beavers manage the riverbanks of Yellowstone, the rivers began to signs of deterioration, which affected birds, fish, and hunting grounds for bears.

Now that wolves have been reintroduced in Yellowstone, elk populations are stable, yet the elk are forced to move much more frequently so the pressure on willows has diminished, allowing beaver population to increase and the rivers to change once again. This story is an incredible example that highlights the power of a keystone species- and the damaging ways humans can impact an entire ecosystem.

Respond to the following questions.

  1. Why do you think wolves were hunted to extinction in the 1930’s?

  2. What do you think the long term impacts of wolf reintroduction will be?

  3. Can you think of any animals that may be a keystone species? Are they endangered? If so, what can YOU do to help protect that species?

    Reflection Questions

    1. Give an example of a primary consumer and an example of a secondary consumer.

    2. What is one thing you learned from this activity?

    3. Why is it important to protect animals from becoming endangered or extinct?

    4. What can YOU do to protect animals from becoming endangered or extinct?

    Did you enjoy today’s activity? Stay tuned for more, and in the meantime…

    Send us a photo of yourself doing today's activity and if you would like, please share your name(s) and where you are from with cisonline@changeissimple.org!