online learning

Exploring the Biosphere (2 of 3)

Welcome to Change is Simple’s Online Learning Platform!

Overview: Today, we are going to be exploring the biosphere! The biosphere is all of the regions of earth, from the surfaces, the water, and the atmosphere! The previous lesson was focused all around the water on earth; something we scientists call the hydrosphere. Today we are going to learn about a different aspect of our biosphere: the atmosphere!

Grade Level: 2-4

Theme: Earth Systems

Supervision needed? No

Essential Questions: 

  • What are 4 different types of clouds?

  • Why do we consider the atmosphere a protective layer?

  • What are some ways that humans emit greenhouse gases into our atmosphere?

  • What happens when we have an excess of greenhouse gases in our atmosphere?

Materials Needed:

  • Cotton balls

  • Sheet of paper

  • Tape or glue

  • Writing utensil

Standards:

Vocabulary:

  • Atmosphere

  • Troposphere

  • Stratosphere

  • Greenhouse gas

  • Greenhouse effect

  • Air pollution

Activity 1:

As we learned in the video, our earth’s atmosphere is made up of five different layers! Can you remember what the first layer in our atmosphere is called? The troposphere! This is where all of our weather occurs, and where our clouds form.

Let’s make some model clouds and practice studying them!

IMG_4465.JPG

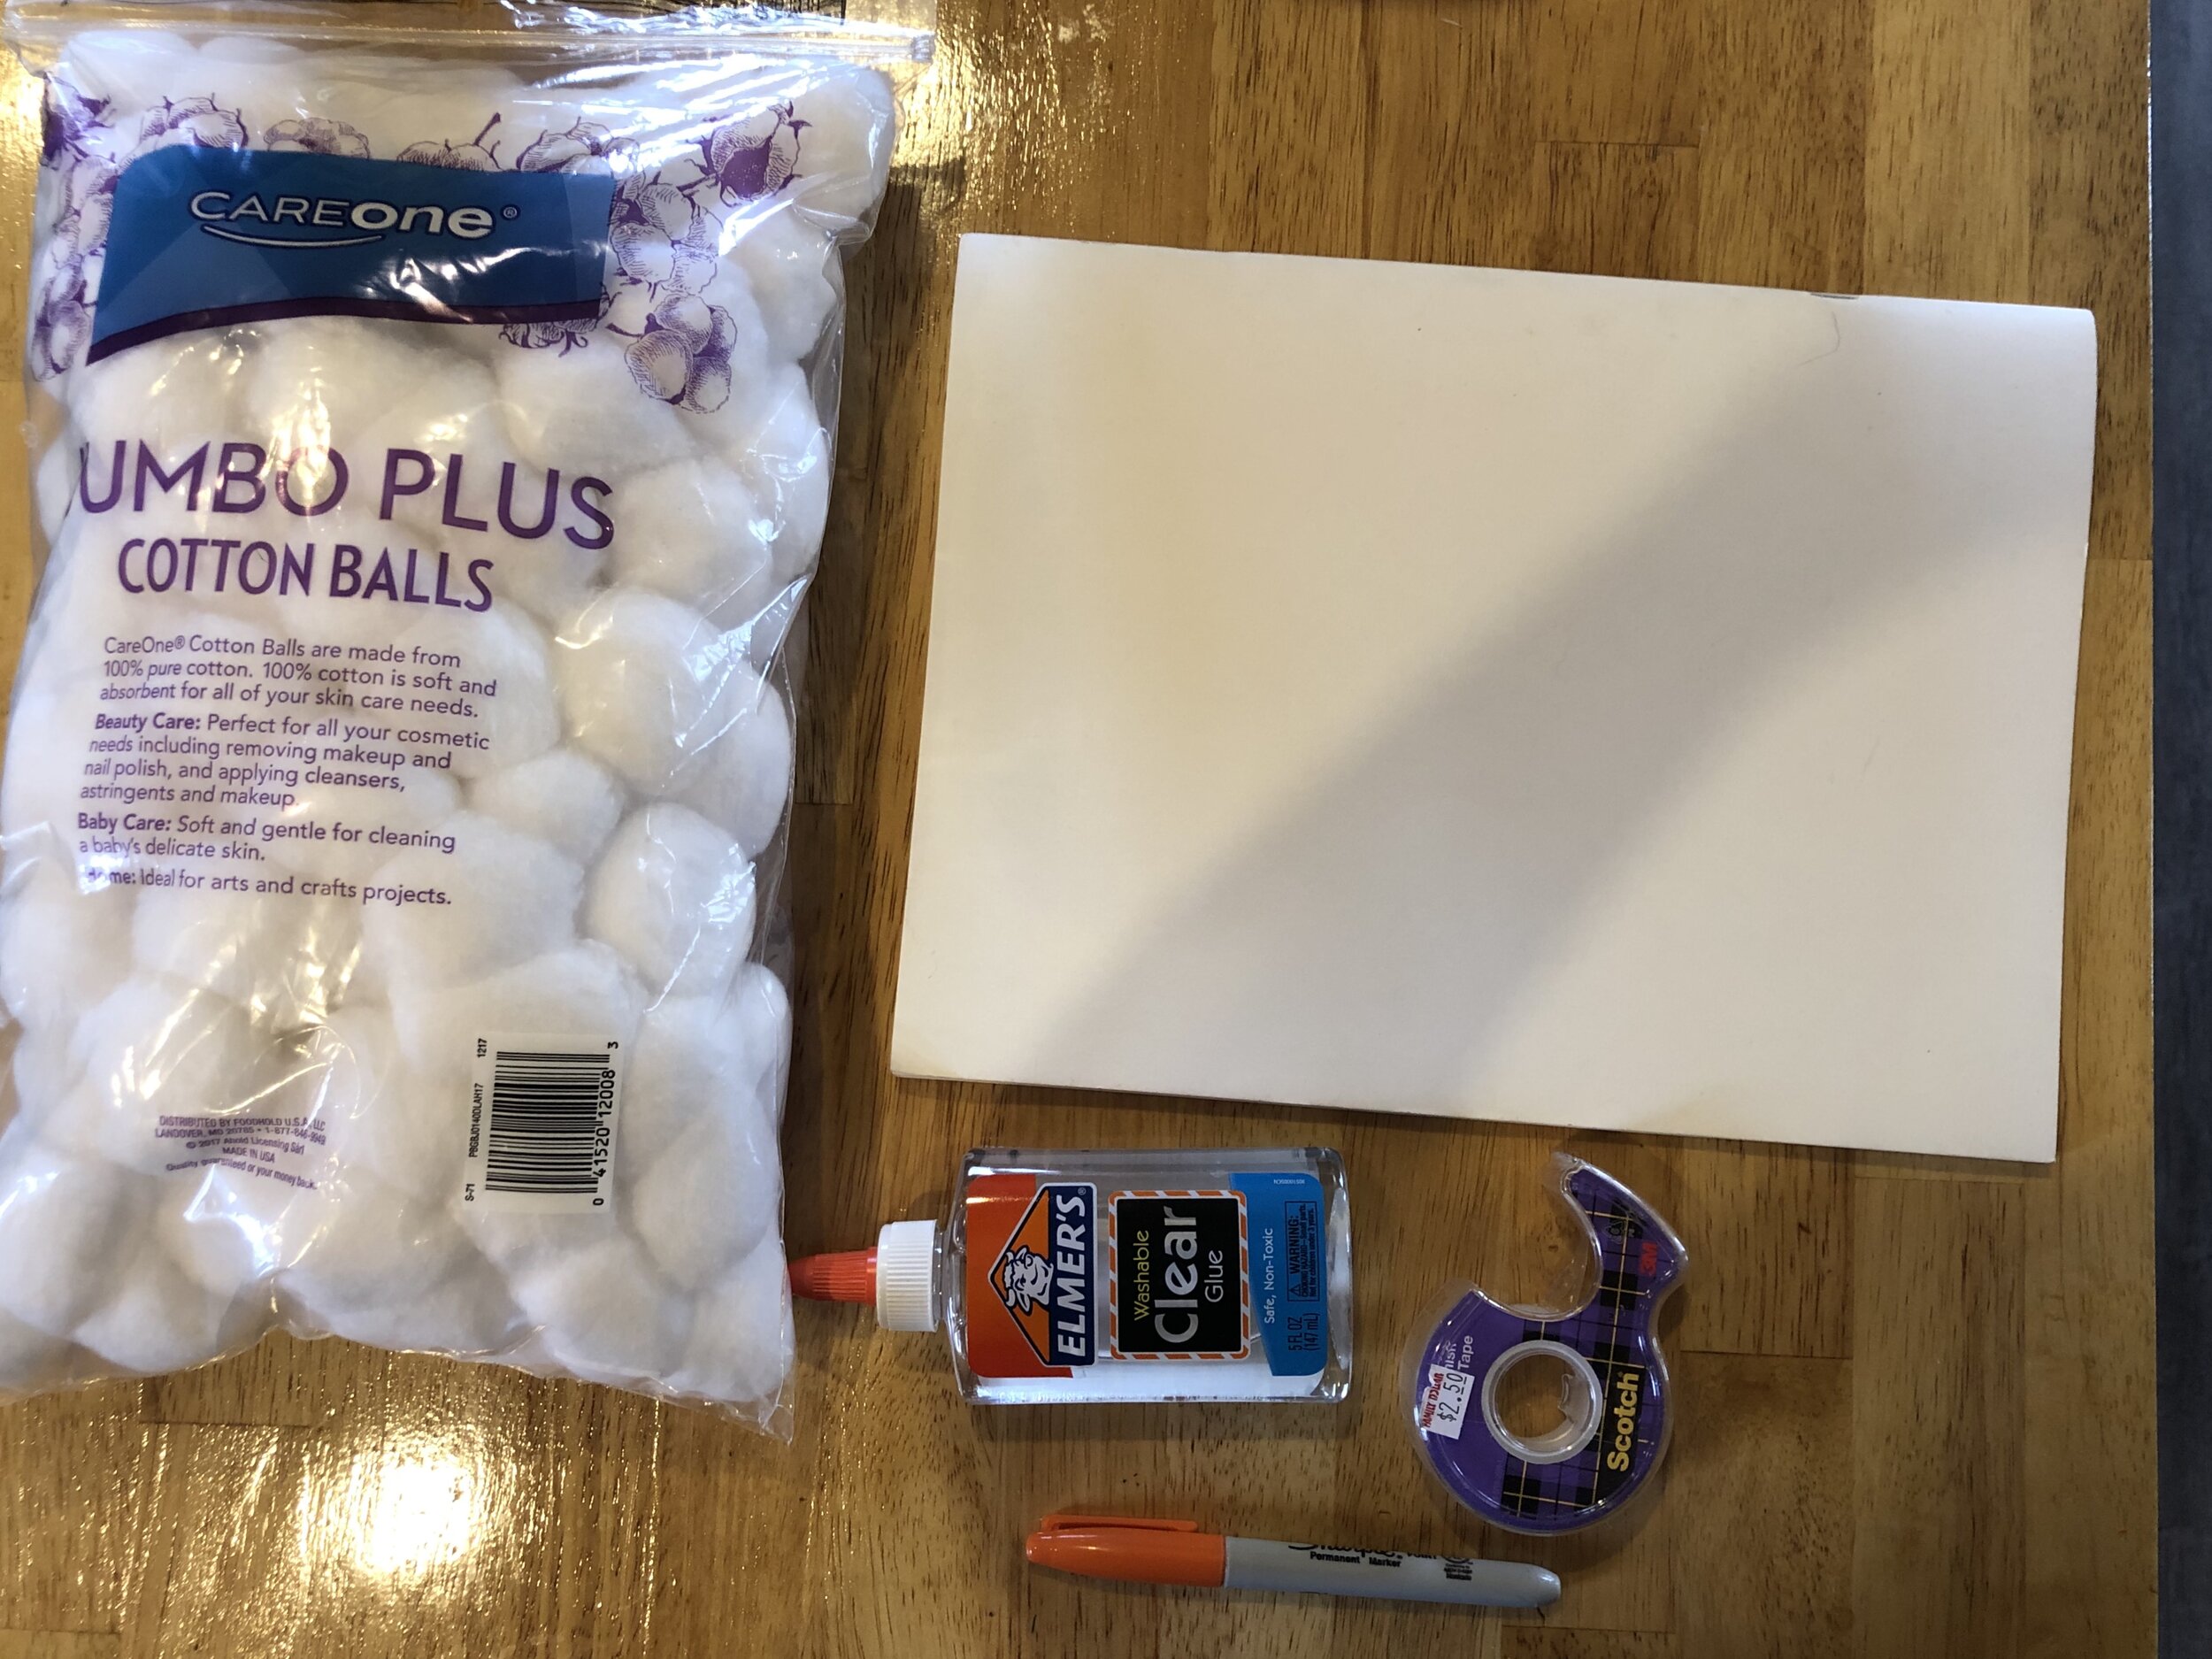
Materials needed:

  • Cotton balls

  • Sheet of paper

  • Tape or glue

  • Writing utensil

Step 1: Create your clouds!

Cumulonimbus: (mid level) dark, grey, cover entire sky and block the sun (signals rain or snow)

Cumulus: (low level) fluffy, cotton-ball appearance

Stratus: (low level) thin, papery, cover entire sky

Cirrus: (high levels) light, curly, hair-like appearance

IMG_7599.JPG

Step 2: Label your clouds.

Step 3: Take your clouds outside and see if any of the clouds in the sky resemble the clouds you just created with your cotton balls!

https://research.noaa.gov/article/ArtMID/587/ArticleID/2563/Tiny-Particles-Lead-to-Brighter-Clouds-in-the-Tropics

Activity 2 (Alternative)

If you do not have the materials for activity two, simply head outside with a sheet of paper and pencil. Look up at the clouds and try to draw the shapes of the clouds you can see in the sky. Next, try to identify which types of clouds you see!

Additional Activities and Resources

This fun, common science activity has been done by students across the world for many years! Parents may remember doing this one as a child themselves! This activity is best suited for grades 4+.

https://www.growingajeweledrose.com/2019/03/cloud-experiment-for-kids.html

Did you enjoy today’s activity? Stay tuned for more, and in the meantime…

Send us a photo of yourself doing today's activity and if you would like, please share your name(s) and where you are from with cisonline@changeissimple.org

Exploring the Biosphere (1 of 3)

Welcome to Change is Simple’s Online Learning Platform!

Overview: In this learning unit, we are going to be exploring the biosphere! The biosphere is all of the regions of earth, from the surfaces, the water, and the atmosphere! Our first lesson is focused all around the water on earth; something we scientists call the hydrosphere. Check out the activity below, and be sure to check out the following lessons this week on the atmosphere and the lithosphere!

Grade Level: 2-4

** Older students, check out activity 2

Theme: Earth Systems

Supervision needed? Yes

Essential Questions: 

  • Define the biosphere.

  • What are some examples of water in the three states of matter? (liquid, solid & gas)

  • Can you describe the different parts of the water cycle?

  • How does pollution effect water quality?

Materials Needed:

  • 3 glass jars or pint glasses

  • One sheet of magazine paper (colorful!)

  • Water

  • Food coloring (preferably blue or purple)

  • Sand/dirt/gravel (one handful is plenty)

  • A stirrer (a spoon works great)

Standards:

Vocabulary:

Hydrosphere Evaporation Transpiration Condensation

Precipitation Water quality Transparent/transparency Physical pollution

Chemical pollution

Activity 1: Water Quality Study

Materials needed:

Screen Shot 2020-05-14 at 10.58.00 AM.png
  • 3 glass jars or pint glasses

  • One sheet of magazine paper (colorful!)

  • Water

  • Food coloring (preferably blue or purple)

  • Sand/dirt/gravel (one handful is plenty)

  • A stirrer (a spoon works great)

Make sure you’ve watched the video before you participate in this activity! Today, we are going to study how different types of pollution affect the transparency of water in rivers, lakes, and oceans. As you saw in the video, how transparent water is can tell a scientist a lot about how clean and healthy that water is!

Screen Shot 2020-05-14 at 11.02.51 AM.png

Step 1: Place your empty glasses onto the magazine or colorful sheet of paper. Fill each glass jar 3/4 of the way fill with water. (Math question: 1. How many 1/4’s are in 1 cup? 2. If you filled your jar 3/4 full, how much of your jar remains empty?)

Step 3: Read the following passage carefully before continuing with your jars.

https://www.huffpost.com/entry/shell-oil-spill-gulf-mexico_n_57353058e4b060aa7819ee00

Each of your three jars represents a body of water in our hydrosphere.

The first jar represents a section of the ocean in the Gulf of Mexico. In the Gulf of Mexico, we drill for lots of oil, which can create oil pollution and other types of chemical pollution in the water.

https://theswellesleyreport.com/2016/04/annual-earth-day-clean-up-along-charles-river-in-wellesley-april-30/

The second jar represents part of the Charles River in Boston. This river meanders throughout the city and borders many roads, construction sites, and buildings. Unfortunately, lots of physical pollution (dirt, gravel, trash, salt) ends up traveling from the city to the river.

https://www.ripleys.com/weird-news/clear-lake-underwater-forest/

The third jar represents a lake in Western Massachusetts. This lake is surrounded by homes, however the sides of the lake are protected by trees and vegetation (plants) . This vegetation absorbs any chemical pollution and keeps lots of trash and other physical pollution from entering the water!

Step 4: Take jar one (the ocean), and put a few drops of your dark food coloring in the jar. This food coloring represents the oil spills and other forms of chemical pollution that can enter our water.

Step 5: Take jar 2 (the Charles River) and dump your gravel, sand or dirt in the jar. This dirt represents the physical pollution that ends up in our water.

Step 6: Grab your spoon, and mix the pollution in each jar. After mixing each jar, peer down into the jars.

IMG_5F7D17DD2A8C-1.jpeg

Which jar is the most transparent?

Which jar is the least transparent?

What does this tell you about how pollution affects water quality?

After you finish this activity, you should be able to answer the questions above. If you are struggling, be sure to review the video, or continue reading below for a brief review.

When water is transparent/clear, more sunlight is able to travel through the water. This sunlight allows tiny plants called phytoplankton to grow. These plants are at the basis of many aquatic food chains. Small creatures eat these plants, and become food for larger fish. This is a very basic food chain, which we learned about a few weeks ago! This food chain is very important, because it ensures a healthy aquatic system and often is the basis for food chains that end with people on top (meaning we eat the fish that depend on these small phytoplankton).

When pollution enters our hydrosphere, whether it’s in the form of chemical pollution or physical pollution, it can get trapped in our water systems. This pollution makes water dark, murky, and cloudy. When water is dark and cloudy, less sunlight is able to enter the water and help plants grow. Where there is no sunlight, there is often no plant life!

Activity 2: An in Depth Look at the Water Cycle

This part of today’s lesson is a deeper dive into the topics covered in the video, best suited for 5th+.
In the video we just watched, we learned how water condenses into cloud formations, gets heavy and then falls as precipitation. That precipitation falls on water or land, and what happens next depends on where the precipitation falls.

Oceans, lakes, rivers: Water falling over other will become our surface water and eventually evaporate.

Plants and trees: Some water will transpire, but some water will enter the soil and water the roots.

Hard surfaces (pavement, cement): Water falling on hard surfaces will become surface run-off, and travel to a nearby body of water, collecting lots of pollution with it.

Soil: Water falling on dirt/soil will infiltrate the soil, meaning sink below the surface. This water will enter a body of water called our groundwater. Groundwater is water stored beneath our ground!

Ice: When rain falls over ice caps or glaciers, it will freeze. However, ice can evaporate, and turn from a solid to a water vapor/gas without ever becoming a liquid! This process is called sublimation.

Test your knowledge!

You just added some new terms tot he ones we talked about in the earlier part of the lesson. Here’s a list of the important ones we just mentioned along with some from earlier:

Surface water Ground water Sublimation Transpiration

Precipitation Condensation Evaporation

Look at this image and match each letter to one of the terms above. The answer key is below, so try not to look before you’ve matched every letter!

Content added to image, image sourced from: OpenClipArt.org

Content added to image, image sourced from: OpenClipArt.org

Answer key

A: evaporation

B: precipitation

C: condensation

D: ground water

E: surface water

F: transpiration

G: sublimation

If we take care of the water in our hydrosphere by reducing pollution and cleaning up pollution, we can help to protect aquatic life and keep our waters clean for years to come!

Did you enjoy today’s activity? Be sure to take pictures and send them to cisonline@changeissimple.org! Stay tuned for Wednesday’s lesson on the atmosphere!!

Reducing Waste (3 of 3)

Welcome to Change is Simple’s Online Learning Platform!

Overview: Today is a review of this unit’s information that was covered in the previous two lessons. Access to those two lessons is at the bottom of this page. Today’s activity is a set of questions through a form that is based on the topics from the 2 previous lessons.

Grade Level: K-6

Theme: Waste Reduction

Supervision needed? No

Essential Questions: 

Materials Needed:

Standards:

Today’s Activity:

This week we covered a few ways that we could reduce our waste production. We’d love for you to complete this reflection through Google Forms as today’s activity.

If you can’t access the page above, click on the link below to take you to the Google Form directly!


Not here on Monday or Wednesday? Here’s a refresher!

Check out these videos to get a sense of what we talked about.

Monday

Wednesday


Did you enjoy today’s activity? Stay tuned for more, and in the meantime…

Send us a photo of yourself doing today's activity and if you would like, please share your name(s) and where you are from with cisonline@changeissimple.org

Reducing Waste (2 of 3)

Welcome to Change is Simple’s Online Learning Platform!

Overview: Today we are going to learn all about reducing waste in our lives when we are in the kitchen! Today we will learn how we can make an impact by making our own food from scratch.

Grade Level: K-6

Theme: Waste Reduction

Supervision needed? Yes

Essential Questions: 

  • What are some ways we can create less waste?

  • What can we do with food waste that is more sustainable than putting it in the trash?

  • Why do we want to make food from scratch at home?

Materials Needed:

  • 2 Garbanzo Beans / Chick Peas

  • 1 Lemon / Lemon Juice

  • 2 Tbsp Oil (Olive Oil)

  • 1 Tsp Salt/Pepper

  • 1 Tsp Garlic

  • 1 Tsp Cumin

  • a Splash Water (Only if it’s too thick)

  • Food Processor / Blender / Or a Fork!

  • **add anything to this recipe that sounds yummy to you!

Standards:

Introduction video

activity one - hummus

Supplies Needed:

  • 2 Garbanzo Beans / Chick Peas

  • 1 Lemon / Lemon Juice

  • 2 Tbsp Oil (Olive Oil)

  • 1 Tsp Salt/Pepper

  • 1 Tsp Garlic

  • 1 Tsp Cumin

  • a Splash Water (Only if it’s too thick)

  • Food Processor / Blender / Or a Fork!

  • **add anything to this recipe that sounds yummy to you!

**ALL OF THE AMOUNTS OF INGREDIENTS ARE SUGGESTED, ADD HOWEVER MUCH OF EACH TASTES GOOD TO YOU!

IMG_0449.JPG

Step One:

  1. Use a Can Opener to open and drain the chick peas. Don’t drain all of the water. It can be helpful to use later if the hummus is too dry.

  2. Cut the lemon in half and squeeze out the juice

    1. I typically use one whole lemon per 2 cans of chick peas.

Step Two:

  1. Toss in the chick peas into the food processor!

  2. Pour in the lemon juice!

    1. My food processor is small so I had to use half the amount of chick peas and lemons for each round.

  3. Pour in the olive oil. Use about 2 Tbps per can of chick peas

  4. Toss in the spices!

IMG_0414.JPG

Step Three:

  1. Blend it up!!

  2. If it doesn’t mix all the way through… you may need to add more oil and possibly a splash of water!

**Once it’s blended up, do a taste test and add more of what you think will make it taste better!**

**If you don’t have a blender / food processor - check out Step Six for suggestions**

IMG_0462.JPG

Step Four:

  1. Make sure to compost any food scraps!

When food scraps are composted, the nutrients in them are broken down into healthy soil to be used to grow new fruits and vegetables.

**If food scraps are placed into the trash can, the nutrients in them will not be turned into new soil.

  • Landfill: There isn’t any oxygen, so the food cannot decompose properly into soil SO it breaks down anaerobically which means it will release a lot of methane gas (greenhouse gas)!

Step Five:

Voila! Hummus is made and can be stored in a reusable container that can be washed out when your hummus is all eaten up. Then cleaned out and reused for the next batch of hummus!

IMG_0463.JPG

Step Six: Alternatives

  • No Blender? No Problem!

    • Use a fork or some other tool to mash the ingredients together. Don’t worry! It will still come out just as good! It just may be a bit chunky, but hey, it’s still hummus :)

  • Want to add different herbs or spices? GO FOR IT! Anything goes. Just try stuff out.

  • Want to add some flavor? Saute some chopped onions in olive oil in a pan for 5-10 minutes, then add to the mix to blend together!


activity two - alternative

If you don’t have the supplies to make hummus or want to make something different, we encourage you to:

  1. Think of one item you buy in the store that comes in a lot of plastic packaging

  2. Search Google for a good recipe to make it from scratch (you may have to try a few different things - some things are harder to make than others!)

  3. Make the recipe with an adult! Have fun with it!

What you will need:

  • Adult Supervision / Assistance

  • Some food and spices

  • Creativity!

Examples:

  • Bread - this comes in SO much plastic film and we can easily make it from scratch and create less plastic waste!

  • Granola / Granola Bars - Individually wrapped items have a huge carbon footprint and plastic waste generation - try making it from scratch with healthier ingredients and with less waste!

  • Oatmeal - Many times this is individually wrapped in plastic. This can easily be made at home from rolled oats and whatever else you want to add to make it delicious!

reflection

Question 1: Did you have fun making food from scratch?

Question 2: Why do we want to make food from scratch at home instead of buying the packaged items in the grocery store?


Did you enjoy today’s activity? Stay tuned for more, and in the meantime…

Send us a photo of yourself doing today's activity and if you would like, please share your name(s) and where you are from with cisonline@changeissimple.org

Reducing Waste (1 of 3)

Welcome to Change is Simple’s Online Learning Platform!

Overview: Today we are going to learn all about reducing waste in our lives. We will see how much waste we truly create and what are some easy ways we can help lower that amount. We will be learning how to sew up a ripped shirt ourselves!

Grade Level: K-6

Theme: Waste Reduction

Supervision needed? Yes

Essential Questions: 

  • What are natural resources?

  • Why should we care about how much waste we produce?

  • What is beneficial about reusing or repairing old stuff?

Materials Needed:

  • Ripped t-shirt or clothing

  • Needle

  • Thread

  • Scissors

Standards:

Introduction video

activity one - sewing

Supplies Needed:

  • Ripped t-shirt or clothing

  • Needle

  • Thread

  • Scissors

IMG_0412.JPG

Step One:

  • Cut off plenty of thread in comparison to the length of the rip

    • Choose a thread color that matches the fabric

I CHOSE A DARK COLOR FOR A BETTER VISUAL

  • String the thread onto the needle (I used that silver guy to help me)

  • Pull the thread even in length on both sides

IMG_0413.JPG

Step Two:

  • Tie a knot at the end of the two pieces of thread on the opposite side of the needle

IMG_0414.JPG
  • Pull the knot tight

IMG_0415.JPG

Step Three:

  • Turn your article of clothing inside out

IMG_0416.JPG

Step Four:

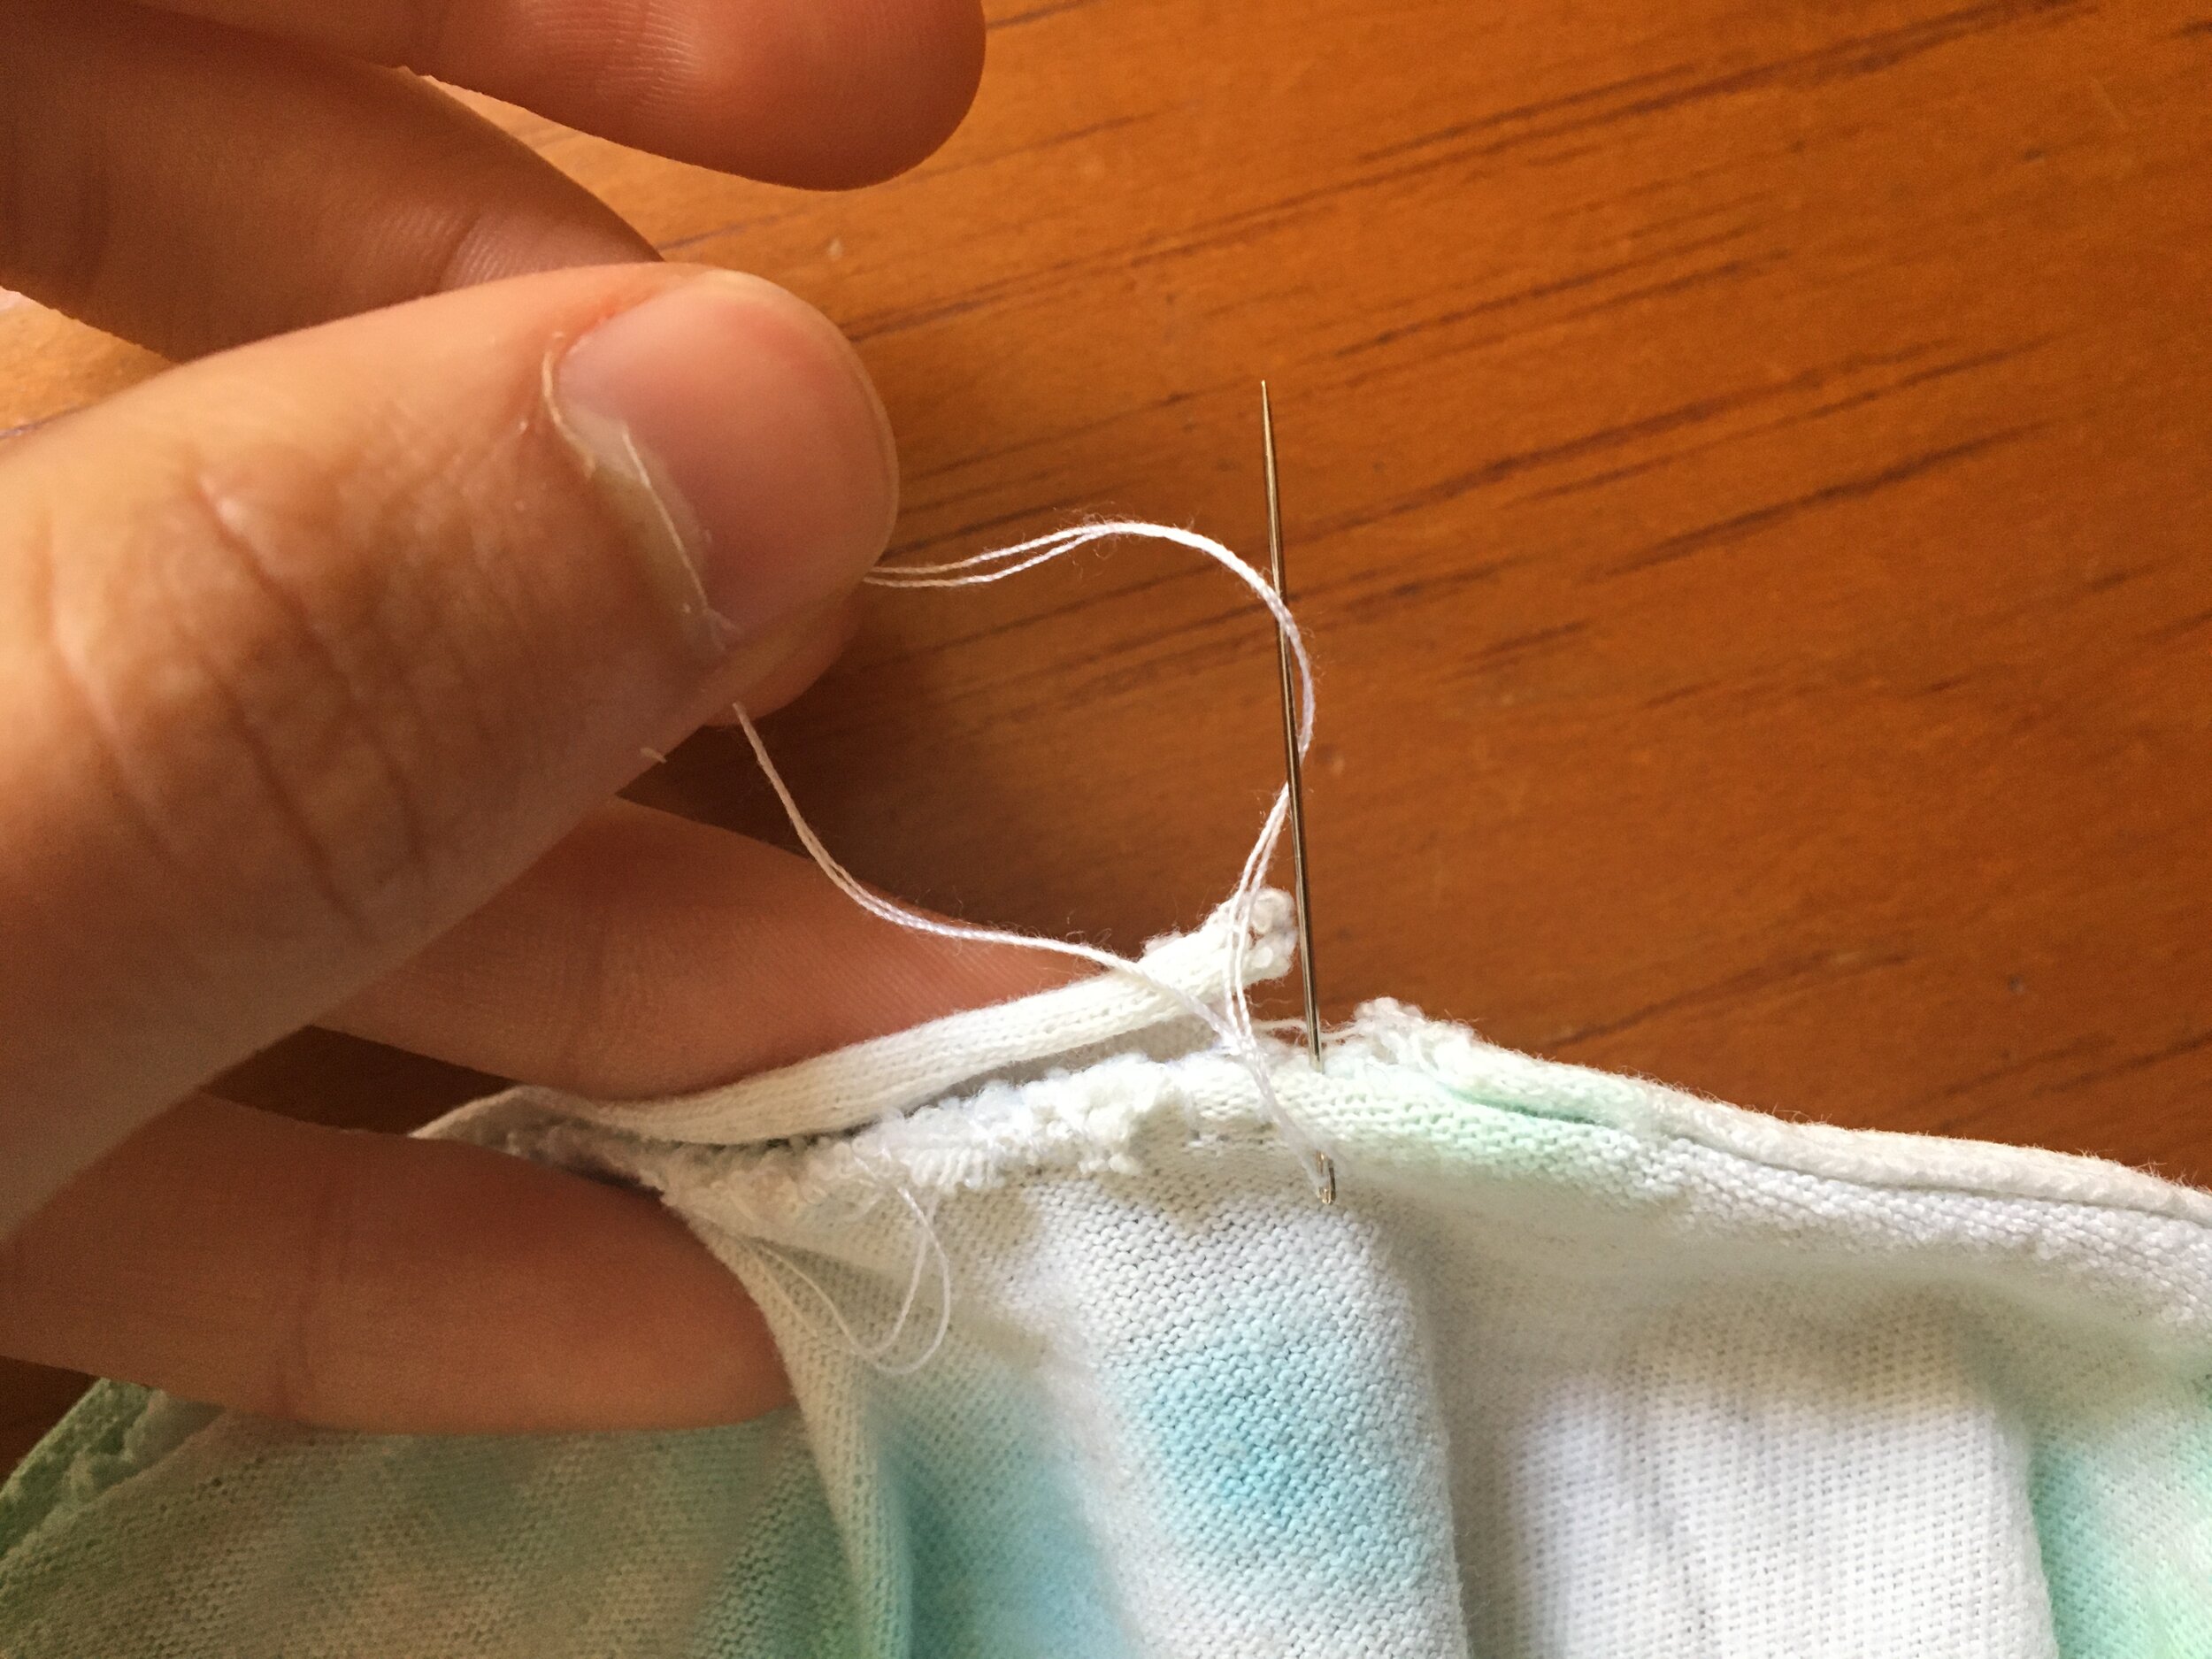
  • Pinch the two sides of the rip flat against each other

IMG_0417.JPG

Step Five:

  • Push the needle through the two sides of the fabric

  • **Make sure to start a bit to the side of the opening to make sure you don’t miss any spots (I started to the left of my rip)

IMG_0418.JPG
  • Gently pull it through until the knot reaches the first side of the fabric

  • **DO NOT PULL IT THROUGH**

IMG_0419.JPG

Step Six:

  • Bring the needle back to the first side and push it through again right next to the first spot

  • Pull it through gently and pull mostly tight, but making sure not to pull the first knot through the fabric

IMG_0420.JPG
  • Continue doing this until you have sewn past the other edge of the rip

  • **Make sure to continue to line up the two pieces of fabric making sure they are flat against one another.

IMG_0423.JPG

Step Seven: Version #1

It’s time to make a finishing knot!

**sorry I switched yarn color :)

  • Put the needle through the two layers of fabric

IMG_0425.JPG
  • Make a knot using the needle side of the thread on the back side of the shirt.

IMG_0433.JPG
  • Continue to pull the needle through

IMG_0434.JPG
  • Pull the needle, making the knot tight

  • Repeat 2-3 times

IMG_0436.JPG

Step Seven: Version #2

As a secondary measure, you can tie a separate knot with the thread.

  • After the needle is through the fabric, tie a knot with the needle

IMG_0424.JPG
  • Pull it tightly to the surface of the fabric on the back side

IMG_0426.JPG

Step Eight:

  • Cut the excess thread

  • Turn the shirt right side out

  • Horray!! You’ve fixed your clothing!

IMG_0429.JPG

activity two - alternative

What you will need:

  • Adult Supervision / Assistance

  • Item to fix

  • Creativity!

What can you fix in your house that is broken or needs repairing? Repairing things so we don’t have to throw them away is a huge way we can have a positive impact on the environment and save our precious natural resources!

Choose an item in your home that you would have thrown away and find a way to repair it.

Examples:

  • Jeans with a hole in them - patch them up!

  • Backpack with a rip or broken zipper - ask your parents for help sewing it up and fixing it

  • Turn cardboard boxes into a play space!

  • Repairing an old bookshelf or piece of furniture!

step 3: reflection

Question 1: Why is it important to sew up ripped clothing or repair items instead of throwing them away?

Question 2: What is all of our STUFF made from? (Hint: They occur naturally on earth)


Did you enjoy today’s activity? Stay tuned for more, and in the meantime…

Send us a photo of yourself doing today's activity and if you would like, please share your name(s) and where you are from with cisonline@changeissimple.org

Renewable Energy Sources (2 of 3)

Welcome to Change is Simple’s Online Learning Platform!

Overview: Next on the list of renewable energy sources is hydropower! Following solar power, hydropower is the second most popular renewable energy source in the US. In today’s lesson you will learn more about how water can generate electricity, how we use hydropower, and even create your own turbine! Check out the video below to get started.

Grade Level: 4-6

**For younger students, ask a friend at home for assistance!

Theme: Energy Conservation

Supervision needed? No

Essential Questions: 

  • What does renewable energy mean?

  • How does hydropower work?

Materials Needed:

  • Bottle Cap

  • Pencil/Pen

  • Ruler

  • Paper Plate

  • Tape

  • Scissors

  • Stick

Standards:


Vocabulary:

  • Electromagnetic generator: converts motive force or mechanical energy (in this case it is the water pushing the turbine) into electrical power

  • Potential energy: mechanical energy, stored energy, or energy caused by its position (like when a ball is placed at the top of a hill)

  • Transformer: a device that takes power from the generator and converts it to higher-voltage current which we can then use

  • Gravitational pull: force which tries to pull two objects toward each other

Activity one

Today we will be creating our own hydropower turbines!!

You will need:

  • Bottle Cap

  • Pencil/Pen

  • Ruler

  • Paper Plate

  • Tape

  • Scissors

  • Stick

 
IMG_0379.jpg

Step One: Take the cap to a bottle and draw a circle around the center of the paper plate.

 
IMG_0380.JPG

Step 2: Cut the edge of the paper plate off.

 
IMG_0382.JPG

Step 3: Take the ruler and draw 4 lines across the plate. Top to bottom, side to side, and the middle sections - all through the center of the plate.

 
IMG_0384.JPG

Step 4: Take the scissors and cut on the lines from the outside edge of the plate to the edge of the circle drawn in the center.

 
IMG_0387.JPG

Step 5: Then fold the blades into position. Leaving a small lip at the edge of each blade that stays flat.

 
IMG_0390.JPG

Step 6: If you want to make your blades more water proof, you can put tape over the blade edges.

 
IMG_0394.JPG

Step 7: Take a stick or pole and stick it through the center of the plate. 


Step 8: Now test out your amazing homemade hydropower turbine!

**Tip! If it is too tight around the stick, it might not spin well. So make it a bit looser.

**Also, you can add a rubber band behind the blade on the stick if it slides off too easily.


reflection

Question 1: Try increasing the flow of water over your turbine. Does the turbine spin faster?

Question 2: Do you think more energy generated when the turbine spins faster? Explain your answer.

Refer back to the video if you need a refresher, or do independent research!


Did you enjoy today’s activity? Stay tuned for more, and in the meantime…

Send us a photo of yourself doing today's activity and if you would like, please share your name(s) and where you are from with cisonline@changeissimple.org

Biomimicry

Welcome to Change is Simple’s Online Learning Platform!

Overview: Today we are going to take a look at a topic that you may not have ever learned about in school, yet it is something that impacts your life every single day. Today we are going to examine the exciting field of biomimicry! Biomimicry is the design and production of items or services that reflect processes that occur in nature. When we create and build things, like airplanes for example, we can mimic the biology of birds that depend on their wings to take flight.

Grade Level: 3-5

**For older students, dive deeper into this activity with our additional activity found down below in this blog post!

Theme: Earth Systems

Supervision needed? Yes

Essential Questions: 

  • What is biomimicry?

  • How do humans use biomimicry to our advantage?

Materials Needed:

  • Activity One:

    • Multiple different surfaces

      • A plastic cutting board, piece of paper, sheet, get creative!

      • Multiple liquid materials

        • water, soap, honey, coconut oil, olive oil, etc.

      • Small object (M&M, penny, eraser)

  • Activity Two:

    • A flower or plant from outside (or from Fridays lesson) Try to choose a wildflower or a plant that is in abundance in your backyard!

    • Toothpicks, tweezers

    • Paper and pencil

    • Optional: Magnifying glass

Standards:

Tune in to the video below to learn more about this incredible topic!

Vocabulary terms

  • Biomimicry: the design and production of materials, structures, and systems that are modeled on biological entities and processes.

  • Engineer (noun): a person who designs, builds, or maintains engines, machines, or public works.

  • Evolution:  the process of growth and development or the theory that organisms have grown and developed from past organisms.

Explore engineering!

There are many different ways engineers can apply the principles of biomimicry to designing something and problem solving. Check out these three activities to explore the ways biomimicry can be used! Choose which activity sounds the most exciting to YOU, and go for it!

Activity 1: Exploring the Features of Slippery Surfaces

This activity is best suited for 5+, unless parental supervision and support is present.

Sometimes, simple biomimicry principles allow us to create an easy solution to an everyday problem. One example of this is how engineers haven taken a cue from a plant, called the pitcher plant. The pitcher plant is a carnivorous plant, meaning it eats insects. When insects land on the pitcher plant, they slip down a tube and get stuck inside the plant. This plant is extremely slippery due to a coating of liquid on the surface of the plant!

For this activity, you will need:

  • Multiple different surfaces

    • A plastic cutting board, piece of paper, sheet, get creative!

    • Multiple liquid materials

      • water, soap, honey, coconut oil, olive oil, etc.

    • Small object (M&M, penny, eraser)

Experiment: Explore which combination of materials and liquids create the most slippery surface possible! Record your findings and observe what elements of your design made the most slippery surface, and why!

Activity 2 Part 1: Deconstruction of a Flower

This activity can be done with all ages.

This activity is going to require a form of reverse engineering. We already learned that engineering is the process of creating a product or solution, and reverse engineering is similar. However, when you reverse engineer, you will be deconstructing something, observing it and recording information about your observations, and then use those observations to create something new!

For this activity, you will need:

  • A flower or plant from outside (or from Fridays lesson) Try to choose a wildflower or a plant that is in abundance in your backyard!

  • Toothpicks, tweezers

  • Paper and pencil

  • Optional: Magnifying glass

Step 1: Separate the parts of the plant/flower (look back to Fridays lesson for a review on the part of the flower!)

Step 2: Observe the colors and textures of the plant/flower. Why do you think there are certain colors on different parts of the flower? Why do you think there are different textures on different parts?

Step 3: Observe the shape of the plant/flower. Why do you think the flower is structured the way it is? Hint: Think about which way the plant/flower grows, which parts of the plant/flower on on the top vs. the bottom and why?

Step 4: Pour water over your plant. Observe what happens. Does the water roll off the plant quickly? Does it get captured/stuck in parts of the plant? Does the water get absorbed into any part of the plant?

Step 5: Answer these questions in your observation: Is the stem of your plant strong/weak/flexible? Can your plant capture lots of sunlight? How? Does your plant have any features to repel predators?

Alternative Activity: If you loved the first part of this activity and are eager to explore more features of nature, before you move on to part 2, get outside! Observe other plants and animals features, such as the way tree branches grow and sway with the breeze, the structure of a spider web, or anything that was mentioned in the video above!

Activity 2 Part 2: Observation/Imitation

Use your observations from part 1 and/or the additional activity to envision a new product that mimics some of the properties of nature that you just observed. Check out these examples to get yourself started!

Observation: The sunflower has very large leaves and petals. This feature may exist to allow the plant to capture lots of sunlight to help the plant grow.

Imitation: I could design a solar panel to mimic the shape and structure of sunflower leaves to capture sunlight for energy production.

Observation: The stem of the sunflower is extremely fuzzy. The fuzz helps keep the plant from losing heat and moisture.

Imitation: I can design a sweater to be fuzzy like the stem of a sunflower to help keep me warm.

Observation: Water rolls off the petals of the flower really quickly.

Imitation: How can I create a material that resembles the structure of a flower petal so that is is water proof/water repellent?

Activity 2 Part 3: Product Creation!

It’s time to get creative! Choose one of the imitations you came up with based off of your observations. Find stuff around your home to make a model of your new biomimicry creation! Send us your photos to cisonline@changeissimple.org

Pollination

Welcome to Change is Simple’s Online Learning Platform!

Overview: Today’s topic is pollination! We will be learning about the structure of flowers and how important flowers are for bees! We will be going outside to find flowers in our own area so we can draw them at home. Then we will be labeling the flower parts learned in the video.

Grade Level:  K-6 **For grade 4+ do the bonus activity in Activity Two!

Theme: Earth Systems, Sustainable Food Systems

Supervision needed? Yes

Essential Questions: 

  • What does pollination mean?

  • How do flowers play a role in bees’ lives?

Materials Needed:

  • Sheet of Paper

  • Colored Pencils

  • Camera

Standards:


step 1: Introduction video


step 2: find & draw

Now it is time to get outside and take a picture of a flower around where you live! If you do not have any flowers where you live, choose an image online of your favorite flower.

1. Take a picture of it and then head back inside to draw out the flower! Flowers are an incredibly important part of our pollination process. 

*** Make sure to document like a scientist: Location of the flower, date, and time the photo was taken!

April 16th - 3:10PM - Down the street in a garden.

April 16th - 3:10PM - Down the street in a garden.

2. Now grab your colored pencils and a piece of paper and draw out the flower you found! Get creative! 

IMG_0296.jpg

3. Now it is time to label the parts of our flower! 

Parts to label: stigma, anther, petals, stem, and leaves 

IMG_0297.jpg

Bonus! (Grade 4+)

Want more of a challenge?

  • Now write an explanation of why each part of the flower is important. 

  • What is nectar?

  • Where would pollen be found?

***Once you have finished answering the questions above, click below to see an example!


step 3: reflection

Question 1: Why are bees so important? 


Question 2: What gets transferred from flower to flower? What does that transfer help do?


Question 3: What did you like most about today’s activity?

Question 4: Now take a picture of your flower drawing and your reflection questions. Then email them to us at Change is Simple! (amy@changeissimple.org)


step 4: additional resources

Want to learn more? Check out our extra information to fuel your learning!

Did you enjoy today’s activity? Stay tuned for more, and in the meantime…

Send us a photo of yourself doing today's activity and if you would like, please share your name(s) and where you are from with cisonline@changeissimple.org

Making Paper

Welcome to Change is Simple’s Online Learning Platform!

Overview: Today’s topic is trees and paper making! We will be learning about different types of seeds and trees, why they are so important to us, and we will complete a cool activity where we reuse old paper scraps to make new paper, conserving this amazing natural resource!

Grade Level:  k-6

Theme: Natural Resources, Waste Reduction

Supervision needed? Yes

Essential Questions: 

  • What is a compost critter?

  • How do they play a role in composting our food?

Materials Needed:

  • Scrap paper (check your recycling bin! Most types of paper will work; just avoid magazines and glossy paper, and be sure to remove any staples or plastic, i.e. address windows on envelopes)

  • Bowl of warm water

  • Sponge

  • 2 Towels (kitchen towels, handkerchiefs, pillow cases, or old t-shirts)

  • Blender (students, please ask for permission & help to use a blender, and be sure to clean it out when you’re done! **If you don’t have a blender, you can still do this activity. Just follow the alternative directions in Step 2)

Standards:


Today, we have a fun Spring activity for you. We are going to make our own paper, that can also be planted! How? Watch this video to learn and get started:


Now it’s time for YOU to make your seed paper!

Step 1- Gather scrap paper (at least 5 sheets)

You can use newspaper, printer paper, construction paper, etc. (no magazines or glossy paper)


Scrap paper

Step 2- Rip the sheets up into about 1 inch x 1 inch squares. Place the ripped pieces into a warm bowl of water and let soak for at least 10 minutes.

**If you don’t have a blender, just rip the paper into smaller pieces (as small as you can), place in warm water and soak for at least 30 minutes. Jump to Step 5.**

Ripped paper.png

Step 3- Put your ripped paper into the blender…and make your pulp!

Put 3-4 handfuls of the soaked paper pieces into the blender. Add about 1 cup of water. Blend for 10-15 seconds and check it- if you still see large pieces of paper, blend for another 10 seconds until it is smooth. You’ll want a consistency like applesauce. *Make sure to get permission and help to use the blender!

Step 4- Pour the pulp from the blender into a bowl.

Step 5- Add seeds to your pulp.

Sprinkle seeds (about a tablespoon) into the pulp and stir. You can use wildflower seeds, chia seeds, whatever you might have.

Step 6- Protect the surface of your workspace.

Place a piece of wax paper or a paper grocery bag down, then lay a towel on top of it.

Step 7- Scoop the pulp from the bowl onto your towel

Get your hands right into that pulp! Scoop a few handfuls (let some water drain through your fingers over the bowl) onto your towel, and gently press it into the shape of your choice - circle, square, rectangle, oval, or a funky shape!

Step 8- Place your other towel over your shaped pulp.

Step 9- Absorb the water with a sponge.

Take your sponge and gently press straight down onto the towel over the shaped pulp. This is drawing the moisture up from the pulp into the sponge, and down into the towel. Repeat this at least 5-6 times. Wring out the sponge in between presses if needed.

Screen Shot 2020-04-17 at 10.14.03 AM.png

Step 10- Gently peel back the towel/handkerchief to reveal your paper!

Step 11- Let dry for 24 hours

Carefully pick up the towel that’s underneath your paper by all 4 corners, keeping it as flat as possible (I recommend having someone help with this step), and put it in a safe place out of the way to dry. Be patient and try not to touch or move the paper until it is completely dry. Drying time will depend on how thick your paper is.


Reflection and follow up

  1. What will you do with your seed paper, once it dries? Will you draw or paint on, send a card to someone you miss right now? Please share your ideas, take a picture of your homemade paper, and send it to amy@changeissimple.org. We’d love to see your creations and hear your ideas!

  2. We used scrap/recycled paper in order to make our paper today. Do you know how new paper is made? What natural resource is paper made from?

  3. Why do you think it is important to reduce, reuse, and recycle the paper that we use?

  4. Learn more about the process of how paper is recycled:


Directions for planting your seed paper, once dried and used:

  1. Soak the seed paper overnight

  2. Cut the plantable seed paper into pieces and then cover with soil (1cm deep in a small pot). 

  3. Water it every day- make sure to keep the soil wet to let the seeds sprout.

  4. In a few days, you’ll see how the plants sprout and begin to grow.

  5. Place it in a window that gets good sunlight, or plant it in your yard/garden.

If you do send the seed paper to someone else, be sure to include these directions for them so they can plant it once they’re done with it!

Did you enjoy today’s activity? Stay tuned for more, and in the meantime…

Send us a photo of yourself doing today's activity and if you would like, please share your name(s) and where you are from with cisonline@changeissimple.org!

Let’s see that paper!!

What is your Carbon Footprint?

Welcome to Change is Simple’s Online Learning Platform!

Overview: Today we are going to start this week off by talking about something that relates to every part of our life. Today’s topic is focused on carbon footprints which are impacted by the activities we do, the food we eat, the products we buy, and even how we get around. We are going to talk all about what a carbon footprint is, how it affects our planet and you are even going to calculate your own! Most importantly, we are going to learn some ways we can all lower our carbon footprints!

Grade Level:  4-6

Theme: Energy Conservation

Supervision needed? Yes

Essential Questions: 

  • What is a carbon footprint? 

  • How can I influence my carbon footprint? 

Materials Needed:

  • Computer

Standards:

  • 13.1 Describe types of natural resources and their connection with health.

  • Ecological Health 13.2 Describe how business, industry, and individuals can work cooperatively to solve ecological health problems, such as conserving natural resources and decreasing pollution

  • Ecological Health 13.4 Identify individual and community responsibility in ecological health.

  • Ecological Health 14.2 Identify ways the physical environment is related to individual and community health

  • 14.3 List practices and products that make living safer.


Today we are going to start this week off by talking about something that relates to every part of our life. From the activities we do, to the food we eat and the products we buy, even how we get around. Today’s topic is focused on carbon footprints. We are going to talk all about what a carbon footprint is, how it affects our planet and you are even going to calculate your own! Most importantly, we are going to learn some ways we can all lower our carbon footprints!

Check out the video below to start todays lesson!


Lets take a look at your Carbon Footprint:

Now we are going to find out what your carbon footprint is! Pick a calculator below that best fits your grade. The calculator is going to ask you a bunch of question about what you do in your every day life. Remember almost every thing that we do releases carbon dioxide into the atmosphere.

  • When we use electricity in our homes that power needs to be created somewhere! We burn fossil fuels at a power plants to create electricity. This releases massive amounts of carbon dioxide into the air.

  • Our food is not all grown in our back yard, it is usually grown in another state or country and that food needs to get to you! The distance your food has to travel adds to your carbon footprint.

  • We don’t walk everywhere; we use cars, trains, planes, and trucks to get around. All of these modes of transportation use gas and oil. Again, when these are burned carbon dioxide is released into our atmosphere.

  • Every product that you use; toys, clothes, care products and anything else you might use in your home. It all came from somewhere, whether its oil that is used to make plastic or the processes to create things like cotton, manufacturing creates a ton of carbon dioxide pollution which adds to your carbon footprint!

Once you have found your carbon footprint, record it below and answer the questions to figure out what adds the most to your footprint and how you can lower it.

There is also a math extension attached related to your carbon footprint to help keep your math skills sharp.

Make sure to check out the youtube video “Carbon Footprint explained” below for additional information

Carbon Footprint Calculators:

What’s your carbon footprint? (this depends on which Footprint calculator you use)

Score: _________

OR

Tons/ Pounds of C02: _________

  1. Can you define carbon footprint?

  2. What added the most to your carbon footprint? Why? ( Food, electricity, transportation, waste)

  3. List 4 ways you think you can personally do better?


Reflection:

  1. Do you want to have a large or small carbon footprint?

  2. What are some ways carbon is released into our atmosphere?

  3. What does carbon pollution in the air do to our planet?

  4.  Submit some actions that you are doing to lower your carbon footprint!


Did you enjoy today’s activity? Stay tuned for more, and in the meantime…

Send us a photo of yourself doing today's activity and if you would like, please share your name(s) and where you are from with cisonline@changeissimple.org

Exploring Food Chain

Welcome to Change is Simple’s Online Learning Platform!

Overview: Today we are going to explore the ways in which plants and animals are connected through learning about food chains and food webs! Your student will have the opportunity to create a food web and learn about the impact different keystone species have on an entire ecosystem.

Grade Level:  3-5. For older grades, check out Activity 2.

Theme: Earth Systems

Supervision needed? No

Essential Questions: 

Materials Needed:

  • Paper

  • Colored pencils, markers, or crayons

  • Tape

  • Cardboard

  • String

Standards:

  • Ecological Health 13.2 Describe how business, industry, and individuals can work cooperatively to solve ecological health problems, such as conserving natural resources and decreasing pollution

  • Ecological Health 13.4 Identify individual and community responsibility in ecological health.

  • Ecological Health 14.2 Identify ways the physical environment is related to individual and community health


Check out the video below to get started!

Vocabulary

  • Photosynthesis: The process by which green plants and some other organisms use sunlight to synthesize foods from carbon dioxide and water.

  • Primary Producer: an autotroph organism producing complex organic matter, using photosynthesis.

  • Primary Consumer: an organism that feeds on primary producers.

  • Secondary Consumer: an organism that feeds on primary consumers.

  • Tertiary Consumer: an organism that feeds on primary and secondary consumers.

  • Apex Predator: a predator that exists at the very top of the food chain.

  • Keystone Species: a species on which other species in an ecosystem largely depend, such that if it were removed the ecosystem would change drastically.

Activity 1: Create your food chain.

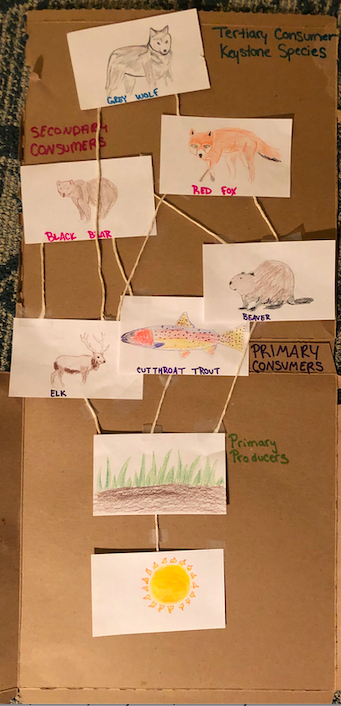
Now that you have an understanding of the producers and consumers that make up a food chain, let’s try our hand at making an entire food web!

Screen Shot 2020-04-09 at 5.03.09 PM.png

Materials

  • Paper

  • Colored pencils, markers, or crayons

  • Tape

  • Cardboard

  • String

Step 1: Choose your favorite ecosystem.

An ecosystem is a community of living organisms (ex: plants and animals) and nonliving components (ex: water, and soil) In my video, I showed you a rainforest food chain. However, there are many others: Desert, ocean, tundra, grasslands are just a few! For this activity, I’m going to focus on Yellowstone National Park, which is a boreal forest!

Screen Shot 2020-04-09 at 4.55.19 PM.png

Step 2: Draw the primary source of energy in your ecosystem. (Hint, it’s the same one that was in my video!)

Screen Shot 2020-04-09 at 4.55.22 PM.png

Step 3: Draw 1-3 plants you may find in your ecosystem.

Can you recall from the video what we call plants in a food web?

Screen Shot 2020-04-09 at 4.55.28 PM.png

Step 4: Draw 3 animals that eat the plants you have chosen.

Can you remember what we call organisms that eat our plants/primary producers?

Screen Shot 2020-04-09 at 4.55.33 PM.png

Step 5: Draw 2 animals that eat the animals you just drew!

Can you remember what we call animals that eat our primary consumers?

Step 6: Draw the animal(s) that eat the animals you just drew!

Can you remember what we call the animals that eat our secondary consumers?

Screen Shot 2020-04-09 at 4.53.27 PM.png

Step 7: Cut out all of your plants and animals. place the cut outs On your board.

Step 8: Create your food web! use markers or string to draw connections between the animals. Most animals eat more than one other species, so be sure to represent that!

Be sure to label your plants and animals by the primary producer, primary consumer, secondary consumer, tertiary consumer, and apex predator.

Additional Activity

For older students or for those interested in learning about the impacts of reintroducing a keystone species into the wild, check out this video on the grey wolf in Yellowstone National Park!

Read and Respond Activity

Read the following summary of an article written about the impact reintroducing grey wolves in yellowstone had on the ecosystem.

The Reintroduction of the Grey Wolf

“Wolves are causing a trophic cascade of ecological change, including helping to increase beaver populations and bring back aspen, and vegetation.” (Farquhar 2019).

In the 1930’s the grey wolf was poached to extinction in Yellowstone National Park. The absence of the wolf meant elk had fewer predators, and as a result elk population skyrocketed. This caused a chain reaction. The elk pushed the ecosystem to its carrying capacity by staying sedentary and heavily consuming willows, cottonwood, and aspen. Willow, being a crucial food source for the beaver along the rivers, declined in population. The decline in willow population led to a decline in beaver population. As beavers manage the riverbanks of Yellowstone, the rivers began to signs of deterioration, which affected birds, fish, and hunting grounds for bears.

Now that wolves have been reintroduced in Yellowstone, elk populations are stable, yet the elk are forced to move much more frequently so the pressure on willows has diminished, allowing beaver population to increase and the rivers to change once again. This story is an incredible example that highlights the power of a keystone species- and the damaging ways humans can impact an entire ecosystem.

Respond to the following questions.

  1. Why do you think wolves were hunted to extinction in the 1930’s?

  2. What do you think the long term impacts of wolf reintroduction will be?

  3. Can you think of any animals that may be a keystone species? Are they endangered? If so, what can YOU do to help protect that species?

    Reflection Questions

    1. Give an example of a primary consumer and an example of a secondary consumer.

    2. What is one thing you learned from this activity?

    3. Why is it important to protect animals from becoming endangered or extinct?

    4. What can YOU do to protect animals from becoming endangered or extinct?

    Did you enjoy today’s activity? Stay tuned for more, and in the meantime…

    Send us a photo of yourself doing today's activity and if you would like, please share your name(s) and where you are from with cisonline@changeissimple.org!